 |
| We bring in the BIG saw! |
Brought this to bear on the frame for the window seat, as it beats trying to cut 2x6's with a circular saw
The last piece of large scale construction left on the library before we can get to paint and stain, is to build a simple window seat. Or at least,
apparently simple.
As you can see in the above photo, the area directly beneath the window contains two items that must be dealt with before we can build our window seat: an HVAC floor vent, and an electrical outlet.
I thought about several ways to utilize the outlet by moving it, either to the front or sides of the window seat, but the room is so small, with 5 other outlets in it already, I decided this plug would be too superfluous to be worth the effort of moving it. I also didn't want to mess up the simple lines of the window seat by installing an outlet in it.
 |
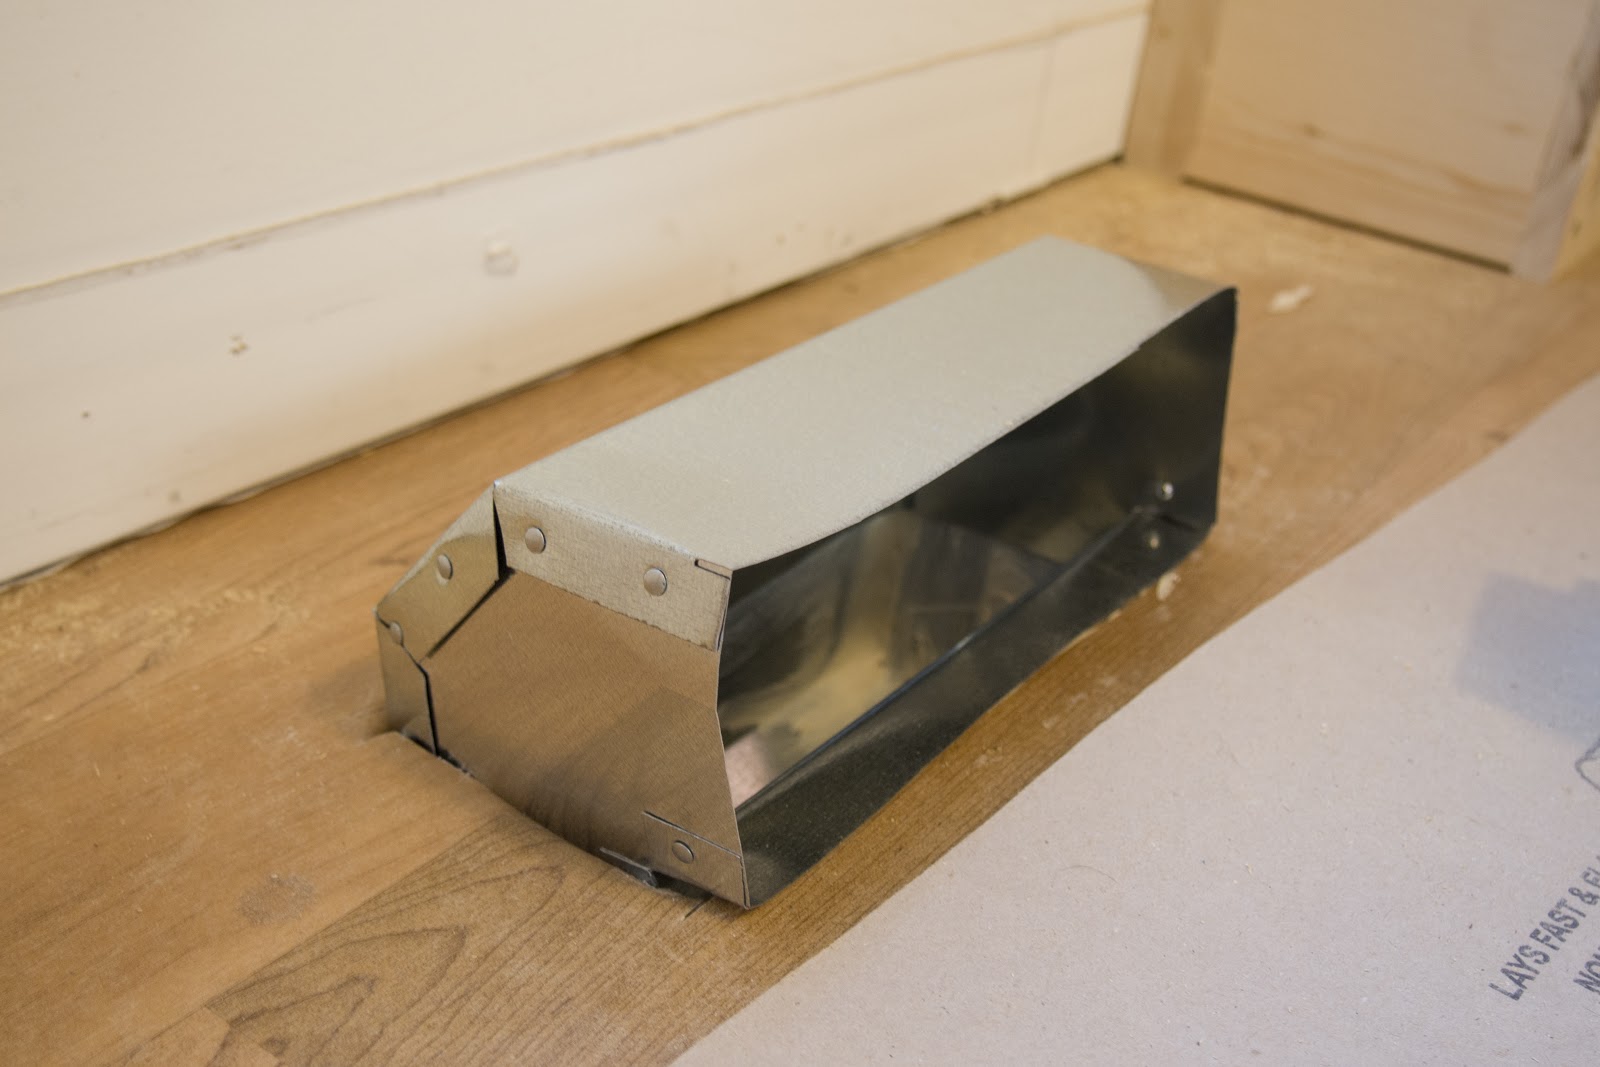
| 90º angle vent |
To deal with the floor vent, I eventually settled on the idea of making the window seat pedestal serve as the
plenum for the HVAC. After pulling the floor vent, I'll insert this 90º piece in the above photo I picked up at the big box store for less than $5. This will help direct the airflow towards the front of the seat pedestal, where I plan to install a nice cast iron toe-kick vent we got from
signaturehardware.com for about $20:
 |
| Attaching this 90º angle will direct the flow forward, and keep it from leaking beneath the floor vinyl |
 |
| Rough cut for the front vent |
The next step was to set about making the pedestal for the window seat to sit on, while also accommodating its use as a plenum for the vent.
Above, you can see that the pedestal construction is much the same as the pedestals we built for the bookcases, except that this one extends out to fit a 24"x 48.5" window seat, and that the front panel is from a higher grade fir, in case I decide to stain this frontice rather than paint it like the others. You can also see in this photo how the old floor vent is not centered on the window, while our new toe-kick vent will be. Rather than try to create an angled plenum crossing from the floor to the kick vent, I just left the plenum larger to bridge both spaces, hoping that the increased plenum area won't reduce air pressure too much.
To help keep any vent noise and heat/cool loss to a minimum, I lined the plenum space with self-adhesive foil insulation:
 |
| This roll was a bit pricey at $18, but solved some problems... |
 |
| Here's the plenum space with vent and liner installed. The window seat will eventually seal it from above |
Now, I can turn my attention to the electrical outlet. I was hoping it was just a single hot/return/ground arrangement that I could cap with wire nuts and be done with it. Turns out, there were 4 lines pigtailed in here, and even after I pulled the outlet, I almost didn't have enough room to install and tuck the wirenuts back in securely:
 |
| Wires, wires everywhere... |
I eventually got all the wires trimmed, encased in wire nuts, taped up and tucked back into the wire box. The proper box cover we got to cover this actually stood too proud of the wall to install, so I just cut a scrap piece of flat vinyl to fit over this box, and screwed it into place to cover the wires so they wouldn't snag when accessing the interior of the window seat, where they might otherwise be exposed.
 |
| Our kitty checking out the seat frame |
In the photo above, besides our kitty, you can see I've got the seat box framed up and ready to accept the birch panels I'll attach to the outside to finish it all off. If you look real close, you can see where I've eliminated the outlet and installed the vinyl plate to block it off. Now, to trim out those panels...
 |
| Raw edge of birch plywood |
Here's an edge on view of one of the Birch plywood finish panels after I've cut, fit and nailed it to the frame. I attached these using glue and brad nails shot from a PorterCable nail gun I borrowed from my Dad. This tool is just the shiz and makes this type of work fast, clean and precise (thanks, Dad!).
But you can see where the exposed edge of the plywood layers aren't very attractive. To address this, I used some iron-on birch stripping (real wood strips with heat activated glue on the back).
 |
| Here's that same edge with a piece of the birch trim about to be applied |
 |
| Iron set to "cotton" to activate the glue |
Pillion actually did all of the birch trim work for the edges around the window seat
(it
did involve ironing after all ...)
Seriously, she just has more patience with this small detail work that I do and I know that if she does it, it'll be right the first time. The trim is made a bit wider than the plywood stock, so you still have to go back and trim/sand to an exact fit after the glue has set.
 |
| Window seat, trimmed out and just about finished |
Once the seat edges were all trimmed out by Pillion, I sanded the edges so there was no overhang to them, and set about creating the top. After talking about various hinge designs, and actually buying hinges, we settled on a hinge-less design for the top:
 |
| This gives us some small storage for blankets, etc |
After all was said and done, I would have changed one thing - I originally chose to to have the front panel "fly" past the edges of the side panels to hide their edges. But when I redesigned the lid to an inset version rather than a hinged version, I should have taken another look at the panel arrangement. As it is, the unchanged panel arrangement caused a small birdsmouth gap near the front, and I hate that this happened:
 |
| Oops! Can I say I meant for it to be this way? |
In the larger scheme of things, this will most likely be hidden by the seat cushion that will eventually reside on top of the window seat, but its a real shame I made this mistake. I'll make sure I fix this if I ever build another library!
As it is, I finished with enough time and good weather on Sunday to change gears and address another chore I've put off for almost 2 years - cleaning and staining the back stairs. Finished with about a cup of stain and an hour of daylight to spare:
 |
| These poor stairs had been left unstained since they were built 2 years ago. Finally done! |
It was hard in light of the unseasonably warm weather not to chuck responsibilities and take the FJR out for a long ride instead. Like, really hard. But I'm happy so much got done this weekend.
Okay, now I'll be able to get back to the final trim work in the library, after a few pints of Guinness to celebrate all of our work so far, of course.
Previous postings on the library construction:


No comments:
Post a Comment